User:Zaku/Sandbox: Difference between revisions
(Added images for Earth Vellumental Temple and Overlook Tower. I'll leave descriptions to you.) |
|||
| Line 170: | Line 170: | ||
'''Images needed''': | '''Images needed''': | ||
:*Blue Streamer: 21 Images | :*Blue Streamer: 21 Images | ||
:*Yellow Streamer: 21 Images | :*Yellow Streamer: 21 Images | ||
| Line 408: | Line 407: | ||
|[[File:Fire Flower PMTOK icon.png|48px]]<br>[[Fire Flower]] | |[[File:Fire Flower PMTOK icon.png|48px]]<br>[[Fire Flower]] | ||
|Description PLACEHOLDER | |Description PLACEHOLDER | ||
|[[File: | |[[File:PMTOK Earth Vellumental Temple Question Block 1.png|360px]] | ||
|- | |- | ||
|[[File:Hidden Block Alert PMTOK icon.png|48px]] | |[[File:Hidden Block Alert PMTOK icon.png|48px]] | ||
|[[File:Mushroom PMTOK icon.png|48px]]<br>[[Mushroom]] | |[[File:Mushroom PMTOK icon.png|48px]]<br>[[Mushroom]] | ||
|Description PLACEHOLDER | |Description PLACEHOLDER | ||
|[[File: | |[[File:PMTOK Earth Vellumental Temple Question Block 2.png|360px]] | ||
|- | |- | ||
| | | | ||
|[[File:PMTOK 100-Coin leaf icon.png|48px]]<br>[[100-Coin]] '''×2''' | |[[File:PMTOK 100-Coin leaf icon.png|48px]]<br>[[100-Coin]] '''×2''' | ||
|Description PLACEHOLDER | |Description PLACEHOLDER | ||
|[[File: | |[[File:PMTOK Earth Vellumental Temple Question Blocks 3 and 4.png|360px]] | ||
|- | |- | ||
|[[File:Hidden Block Alert PMTOK icon.png|48px]] | |[[File:Hidden Block Alert PMTOK icon.png|48px]] | ||
|[[File:Fire Flower PMTOK icon.png|48px]]<br>[[Fire Flower]] | |[[File:Fire Flower PMTOK icon.png|48px]]<br>[[Fire Flower]] | ||
|Description PLACEHOLDER | |Description PLACEHOLDER | ||
|[[File: | |[[File:PMTOK Earth Vellumental Temple Question Block 5.png|360px]] | ||
|- | |- | ||
| | | | ||
|[[File:Shiny Boots PMTOK icon.png|48px]]<br>[[Shiny Boots]] | |[[File:Shiny Boots PMTOK icon.png|48px]]<br>[[Shiny Boots]] | ||
|Description PLACEHOLDER | |Description PLACEHOLDER | ||
|[[File: | |[[File:PMTOK Earth Vellumental Temple Question Block 6.png|360px]] | ||
|- | |- | ||
| | | | ||
|[[File:Shiny Hammer PMTOK icon.png|48px]]<br>[[Shiny Hammer]] | |[[File:Shiny Hammer PMTOK icon.png|48px]]<br>[[Shiny Hammer]] | ||
|Description PLACEHOLDER | |Description PLACEHOLDER | ||
|[[File: | |[[File:PMTOK Earth Vellumental Temple Question Block 7.png|360px]] | ||
|- | |- | ||
|[[File:Hidden Block Alert PMTOK icon.png|48px]] | |[[File:Hidden Block Alert PMTOK icon.png|48px]] | ||
|[[File:PMTOK Coin Bag leaf icon.png|48px]]<br>[[Coin|Coin Bag]] '''×2''' | |[[File:PMTOK Coin Bag leaf icon.png|48px]]<br>[[Coin|Coin Bag]] '''×2''' | ||
|Description PLACEHOLDER | |Description PLACEHOLDER | ||
|[[File: | |[[File:PMTOK Earth Vellumental Temple Question Blocks 8 and 9.png|360px]] | ||
|- | |- | ||
| | | | ||
|[[File:PMTOK 100-Coin leaf icon.png|48px]]<br>[[100-Coin]] | |[[File:PMTOK 100-Coin leaf icon.png|48px]]<br>[[100-Coin]] | ||
|Description PLACEHOLDER | |Description PLACEHOLDER | ||
|[[File: | |[[File:PMTOK Earth Vellumental Temple Question Block 10.png|360px]] | ||
|- | |- | ||
|[[File:Hidden Block Alert PMTOK icon.png|48px]] | |[[File:Hidden Block Alert PMTOK icon.png|48px]] | ||
|[[File:PMTOK Coin Bag leaf icon.png|48px]]<br>[[Coin|Coin Bag]] | |[[File:PMTOK Coin Bag leaf icon.png|48px]]<br>[[Coin|Coin Bag]] | ||
|Description PLACEHOLDER | |Description PLACEHOLDER | ||
|[[File: | |[[File:PMTOK Earth Vellumental Temple Question Block 11.png|360px]] | ||
|- | |- | ||
|[[File:Hidden Block Alert PMTOK icon.png|48px]] | |[[File:Hidden Block Alert PMTOK icon.png|48px]] | ||
|[[File:PMTOK Collectible Treasure 27 (Pipe).jpg|80px]]<br>[[Musée Champignon#Treasure Gallery|Collectible Treasure '''#27''']] | |[[File:PMTOK Collectible Treasure 27 (Pipe).jpg|80px]]<br>[[Musée Champignon#Treasure Gallery|Collectible Treasure '''#27''']] | ||
|Treasure: Pipe | |Treasure: Pipe | ||
|[[File: | |[[File:PMTOK Earth Vellumental Temple Question Block 12.png|360px]] | ||
|- | |- | ||
|-style="background: #d09091;font-size:120%;color:#202122" id="Overlook Tower" | |-style="background: #d09091;font-size:120%;color:#202122" id="Overlook Tower" | ||
| Line 461: | Line 460: | ||
|[[File:PMTOK coin effect.png|48px]]<br>[[Coin]] | |[[File:PMTOK coin effect.png|48px]]<br>[[Coin]] | ||
|Description PLACEHOLDER | |Description PLACEHOLDER | ||
|[[File: | |[[File:PMTOK Overlook Tower Question Block.png|360px]] | ||
|} | |} | ||
Revision as of 15:43, February 16, 2023
Sandbox
My page for large edits or article creations, to ensure all parts are displayed as intended.
Text in blue is simply colored, I will correctly change them to links in the final version.
Current Projects
- Complicated Entry: Fishing Storage (Paper Mario: The Origami King)
- Creating page for ? blocks (Paper Mario: The Origami King)
Glitch Category Names
- Graphics
- Camera
- Audio
- Physics
- Out of bounds and clips
- Scripting
- Softlocks/Crashes/Freezes
- Battles
- Patched Glitches
- Sequence breaks
- Oversights
List of Paper Mario: The Origami King Glitches
Fishing storage

File:PMTOK Fishing Storage Glitch.png
Fishing storage allows the player to hold the fishing rod outside of the restriction of the docks. Due to how loading zones work, this glitch is limited to: Overlook Mountain, Shogun Studios, and Full Moon Island. Despite this limit, this glitch is very potent due to the fishing rod having collision while held by Mario, the ability to quit fishing while catching something, and the ability to return to the dock by pressing ![]() at any time, regardless of what actions are taking place.
at any time, regardless of what actions are taking place.
Methods
There are multiple methods of initiating fishing storage, all of which involve teetering:
Digging with Professor Toad ![]() First method discovered.
First method discovered.
Reading the Sea Chart ![]()
Item Menu ![]()
Talking with Oliva ![]()
Effects

Mario floating across the air.
Mario relocating a Toad.
Mario clipping through the door to Big Sho Theater.
Mario moonwalking after ending fishing storage on a ladder.
A Collectible Treasure suspended in midair.
An interrupted loading sequence, revealing how the game manipulates different assets.
Mario walking inside a loading zone.
Mario initiating a battle while using a Magic Circle
Weapon slot manipulation
The section in memory that stores Mario's party members and the section that stores Mario's equipped weapons are only separated by 4 empty bytes. By gaining a fifth partner, partner information buffer overflows into the first slot of the equipped weapons section, which the game reinterprets as the item obtained at a certain point by Mario.
For example: if Kamek (P_KMK internally) joins as the fifth partner, "K" exceeds the 4 byte buffer and overwrites the first equipped weapon slot. This is reinterpreted as 76 when converted to a number, meaning the 76th item Mario obtained will replace his Basic Hammer.
Paper Mario: The Origami King bestiary
Item Drops
In Paper Mario: The Origami King, item drops are determined by an enemies assigned item drop set, a group of items that chosen at random to be dropped. There are 5* sets used in the game:
| Set Name | Items |
|---|---|
| LV1 / LV2 / LV3 |  |
| Paper / Paper M / Paper L | |
| Gold | |
| BOOTS KURIBOO | |
| MEKAKOOPA | 
|
| BTL_ZAKO_ITEM_L UNUSED ? |
|
BTL_ZAKO_LV2: Stingby, Blooper, Pokey, Ninji, Boo, Spike, Buzzy Beetle, Snifit, Bone Goomba, Rocky Wrench, Scuttlebug, Crowber
BTL_ZAKO_LV3: Fire/Ice/Boomerang/Hammer/Sledge Bro, Chargin' Chuck, Snow Spike, Grass Ninji, Piranha Plant, Spike Top, Stone Spike, Sumo Bro
BTL_ZAKO_PAPER: Paragoomba
BTL_ZAKO_PAPER_M: Paratroopa, Jumping Piranha Plant, Nipper Plant, Li'l Cutout Soldier
BTL_ZAKO_PAPER_L: Ptooie, Big Cutout Soldier
BTL_ZAKO_BOOTS_KURIBOO: Shoe Goomba
BTL_ZAKO_MEKAKOOPA: Mechakoopa
Dry Bones do not drop anything
| No. 07 | | Paragoomba | ||||||
|---|---|---|---|---|---|---|---|

|
HP | 15 | Moves | Location(s) | |||||
| Type | Flying | Flyin' Headbonk (4), Group Headbonk (4 per Paragoomba), Foe Throw (9) | Overlook Mountain, Overlook Tower, Autumn Mountain, Club Island | ||||||
| Role | |||||||||
| Item drops | Small Bag of Confetti | ||||||||
| Paragoombas transformed into origami. They’re pretty smug about those wings, but one stomp and they fall right off. | |||||||||
Image Map Test

? Block locations
.jpg)
- “You've found—and hit—each and every ? Block in the game. Now tell us...which one was your favorite?”
- —Musée Champignon, Paper Mario: The Origami King
In Paper Mario: The Origami King, Mario can find ? Blocks throughout the different Streamer areas, receiving various rewards when struck open. Typically, Mario can use his hammer or jump into the blocks from below, however some blocks are hidden or folded in the case of Origami Castle. Locating these blocks is made easier after purchasing the Hidden Block Alert from the Fun, Funky, and Functional vendor in Snif City, or by acquiring the Hidden Block Unhider from the Toad Researcher 's Sensor Lab in Picnic Road.
This page lists the locations of all 369* ? Blocks, including pictures and information on their contents.
NOTES:
- Only 5 of the 173 ? Blocks found on ? Island are required to satisfy game completion. Thus a total of 193 ? Blocks contribute to the ? Block Head Trophy.*
- Some ? Blocks are found in areas that are inaccessible until returning later; these entries are highlighted in beige.
- Hidden Blocks will be marked with a
 Hidden Block Alert icon.
 - Locations absent from the list contain no ? Blocks.
Images needed:
- Blue Streamer: 21 Images
- Yellow Streamer: 21 Images
- Purple Streamer: 24 Images
- Green Streamer: 6 Images
- Origami Castle: 10 Images
Red Streamer
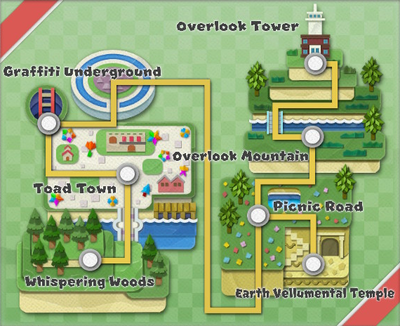
There are a total of 50 ? Blocks to find in the Red Streamer area, 21 of which are hidden:
- Whispering Woods holds 10 blocks
- Toad Town holds 9 blocks
- Graffiti Underground holds 2 blocks
- Picnic Road holds 7 blocks
- Overlook Mountain holds 9 blocks
- Earth Vellumental Temple holds 12 blocks
- Overlook Tower holds 1 block
| Hidden | Item | Description | Image |
|---|---|---|---|
| Whispering Woods | 10 blocks | |||
Mushroom |
The first ? Block seen in the game. Directly after falling into the Whispering Woods and knocking a log down, there is a block floating near a tree. | 
| |
Coin Bag |
In the area with spiky brambles on the ground, there is another ? Block hovering over a Not-Bottomless Hole. | 
| |
Coin Bag |
In another set of spiky brambles, there is an empty patch of ground with a Hidden Block above. This block can be reached safely by using the Super Star from the leaf memory game. | 
| |
Coin Bag |
Before reaching Grandsappy, there is a ledge to the right seperated by a Not-Bottomless Hole. Beyond the hole is another ? Block. | 
| |
Coin Bag |
On the path to Toad's BBQ Foodeatery, there is a Hidden Block above a patch of flowers and grass. | 
| |
Coin Bag |
At the BBQ Foodeatery, there is a swingset with a set of tall stumps nearby. A ? Block can be found above the tallest stump, and can be reached after repairing a Not-Bottomless Hole. | 
| |
Fire Flower |
Beside the campfire is a firewood shed, and behind that is a small bush resting on a dark patch of grass. Jumping atop this area will reveal a Hidden Block. | 
| |
Confetti |
Near the cabin owned by the Toad's BBQ Foodeatery caretaker is a patch of ground with no grass. Jumping here reveals a Hidden Block. | 
| |
100-Coin |
The cabin on these campgrounds has another firewood shed, with a large Not-Bottomless Hole. After repairing this Mario can reach the area behind the bushes, where a ? Block is found resting on the ground. | 
| |
Coin Bag |
A second block is hidden directly above this previous block. | 
| |
| Toad Town | 9 blocks | |||
100-Coin |
Past the clearing of Whispering Woods, there is a set of ledges with a ? Block above a Not-Bottomless Hole. | 
| |
Confetti |
To the right of the Toad Town entrance is a ? Block above a lower ledge. | 
| |
100-Coin |
Between two houses to the west of the town center is a ? Block resting on the ground. | 
| |
Confetti |
Another ? Block can be found at the westmost point of the town, with a Warp Pipe nearby. | 
| |
100-Coin |
Outside the Weapon and Item Shop is a ? Block is situated in the fenced area outlooking The Great Sea. | 
| |
Coin |
Inside the red brick warehouse is a Hidden Block resting beside a set of crates, indicated by a dark square patch on the ground. | 
| |
100-Coin |
Further inside the red brick warehouse, there is another ? Block resting above a set of shelves. | 
| |
Coin Bag |
To the right of the broken bridge leading to Peach's Castle, there is a house home to a ? Block and bookshelf. Striking the furniture will open the drawer, allowing Mario to reach the block. | 
| |
100-Coin |
Required: Navigate the Graffiti Underground After reaching the entrance to Peach's Castle, a ? Block can be found to the left. |

| |
| Graffiti Underground | 2 blocks | |||
Mushroom |
At the base of the stairs leading up from the third level in the sewer, there is a ? Block guarded by Scaredy Rats. | 
| |
Confetti |
Near the Warp Pipe leading back up to the surface, there is a ledge with guardrails and a dark square patch on the ground. Jumping from this spot will reveal a Hidden Block. | 
| |
| Picnic Road | 7 blocks | |||
100-Coin |
Along the path up the hillside is a large Non-Bottomless Hole with a ? Block floating above. | 
| |
Fire Flower |
Beside the main path is a fenced area with a hidden tunnel through the mountainside behind a tree. At the end of this tunnel is a ledge with a ? Block. | 
| |
102 Coins |
At the edge of the pond is an empty block, indicating a line of three Hidden Blocks further towards the center of the pond. The last block contains a 100-Coin. | 
| |
Fire Flower |
Close to the trail at the top of Picnic Road, there is an arrow made of coins pointing towards a breakable bush. Jumping on this spot reveals a Hidden Block. | 
| |
100-Coin |
A ? Block floats beside the cliff face at the top of Picnic Road, where the path trails off towards Overlook Mountain. | 
| |
| Overlook Mountain | 9 blocks | |||
Iron Boots |
At the base of the Overlook Mountain path is a ? Block near a rock. | 
| |
Iron Boots |
To the east of the path to Picnic Road is a bench area with a blue roof. Above the center of this roof is a Hidden Block, which can be reached from the nearby ledge. | 
| |
Fire Flower |
After jumping onto the aforementioned blue roof, Mario can jump across to reach a ledge with a ? Block hovering over a Non-Bottomless Hole. | 
| |
100-Coin |
Near the Monty Mole auctioneer and off the main path, there is another ? Block. | 
| |
100-Coin |
After walking down a slope to reach the local fishing dock, a Not-Bottomless Hole can be repaired to gain access to a ? Block. | 
| |
100-Coin |
Just before reaching the local tram station, a ? Block can be found guarded by a line of Spinies. | 
| |
100-Coin |
Beside the wooden stairs leading up Overlook Mountain from the tram station, Mario can find a ? Block resting on the ground. | 
| |
Coin Bag |
After heading west from the mountain peak, making a detour to the right should bring Mario to a ? Block surrounded by wooden posts and guarded by an ambushing Shy Guy. | 
| |
Hidden Toad #30 |
After reaching the mountain peak, there is a gap in the fences to the west with a ledge just below. This block contains a Hidden Toad. | 
| |
| Earth Vellumental Temple | 12 blocks | |||
Fire Flower |
Description PLACEHOLDER | 
| |
Mushroom |
Description PLACEHOLDER | 
| |
100-Coin ×2 |
Description PLACEHOLDER | 
| |
Fire Flower |
Description PLACEHOLDER | 
| |
Shiny Boots |
Description PLACEHOLDER | 
| |
Shiny Hammer |
Description PLACEHOLDER | 
| |
Coin Bag ×2 |
Description PLACEHOLDER | 
| |
100-Coin |
Description PLACEHOLDER | 
| |
Coin Bag |
Description PLACEHOLDER | 
| |
.jpg) Collectible Treasure #27 |
Treasure: Pipe | 
| |
| Overlook Tower | 1 block | |||
Coin |
Description PLACEHOLDER | 
| |
Blue Streamer
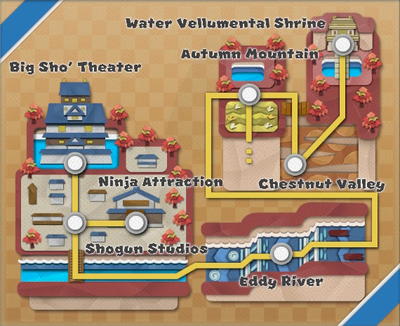
There are a total of 39 ? Blocks to rescue in the Blue Streamer area, 12 of which are hidden:
- Autumn Mountain holds 6 blocks
- Chestnut Valley holds 4 blocks
- Water Vellumental Shrine holds 13 blocks
- Shogun Studios holds 9 blocks
- Ninja Attraction holds 7 blocks
| Hidden | Item | Description | Image |
|---|---|---|---|
| Autumn Mountain | 6 blocks | |||
100-Coin |
Description PLACEHOLDER | 
| |
Shiny Hammer |
Description PLACEHOLDER | 
| |
Fire Flower |
Description PLACEHOLDER | 
| |
100-Coin |
Description PLACEHOLDER |
| |
Coin Bag |
Description PLACEHOLDER |
| |
Hurlhammer |
Description PLACEHOLDER |
| |
| Chestnut Valley | 4 blocks | |||
100-Coin |
At the start of the level, there is a ? Block to the right containing a 100-Coin. |
| |
Shiny Mushroom |
Between the first and second sloped sections is another ? Block. |
| |
Fire Flower |
A ? Block hides on a ledge in the southeast corner of the chestnut maze. |
| |
100-Coin |
There is a ledge that can be reached through a pipe near the peak of the valley, where Bob-omb and a ? Block can be found. |
| |
| Water Vellumental Shrine | 13 blocks | |||
100-Coin |
There is a ? Block on the west path of the main area. | 
| |
Shiny Iron Boots Confetti |
Along the shrine's west path is a set of Brick Blocks and two ? Blocks, guarded by a Sidestepper. | 
| |
100-Coin |
There is a ? Block on the east path of the main area. | 
| |
4 Coins |
A set of stairs lead below the main area on the east side. Down here is a set of four Hidden Blocks near a gap in the border along the ground. | 
| |
Shiny Iron Boots |
At the end of the path below the main area is a dark square patch, and a block hiding directly above. | 
| |
Fire Flower POW Block |
Two ? Blocks float above the block maze found on the east side of the shrine. These can be reached by jumping across said blocks. |

| |
Confetti 100-Coin |
At the end of the east area is a hidden cavern. Here a pair of ? Blocks are found on the higher ledge. |
| |
| Shogun Studios | 9 blocks | |||
Fire Hammer |
Description PLACEHOLDER |
| |
Tail |
Description PLACEHOLDER |
| |
100-Coin |
Description PLACEHOLDER |
| |
Ice Hammer |
Description PLACEHOLDER |
| |
Tail |
Description PLACEHOLDER |
| |
Coin |
In the room leading to the Dry Bones is a Hidden Block in the corner, used to reach hidden Toad #28. | 
| |
Hurlhammer |
Description PLACEHOLDER |
| |
Shiny Boots |
Description PLACEHOLDER |
| |
.jpg) Collectible Treasure #49 |
Treasure: Water Vellumental Shrine |
| |
| Ninja Attraction | 7 blocks | |||
Coin Bag |
Description PLACEHOLDER |
| |
Tail |
Description PLACEHOLDER |
| |
Shiny Hurlhammer |
Description PLACEHOLDER |
| |
4 Coins |
Description PLACEHOLDER |
| |
Yellow Streamer
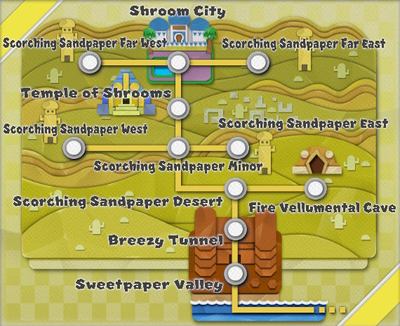
There are a total of 40 ? Blocks to find in the Yellow Streamer area, 19 of which are hidden:
- Breezy Tunnel hold 1 block
- Scorching Sandpaper Desert holds 7 blocks
- Scorching Sandpaper Minor holds 1 block
- Shroom City holds 8 blocks
- Scorching Sandpaper Far West holds 1 blocks
- Fire Vellumental Cave holds 16 blocks
- Temple of Shrooms holds 6 blocks
| Hidden | Item | Description | Image |
|---|---|---|---|
| Breezy Tunnel | 1 block | |||
Coin Bag |
Description PLACEHOLDER |
| |
| Scorching Sandpaper Desert | 7 blocks | |||
100-Coin |
Towards the east side of the desert with the Sun Altar in sight, there is a ? Block containing a 100-Coin. | 
| |
Flashy Hammer |
South of the local desert tower where the sand slopes down, a ? Block can be found above a Not-Bottomless Hole. | 
| |
Shiny Fire Flower Flashy Boots |
There are two ? Blocks among the village ruins found in the southeast corner of the desert. | 
| |
Ice Flower |
Beyond the village ruins and desert cliffs is a hidden area, with a ? Block near the entrance. | 
| |
Coin |
Required: Yellow Streamer destroyed In the freezer below the Sun Altar, there is a Hidden Block resting beside a crate. |

| |
.jpg) Collectible Treasure #64 |
Required: Yellow Streamer destroyed Using the previous ? Block to jump onto the crate, Mario can jump to reveal another Hidden Block, indicated by a dark square patch. This block contains a Collectible Treasure: Temple of Shrooms Statues. |

| |
| Scorching Sandpaper Minor | 1 block | |||
Flashy Iron Boots |
The ? Block is surrounded by three cacti near the entrance to Scorching Sandpaper West. | 
| |
| Shroom City | 8 blocks | |||
100-Coin |
Description PLACEHOLDER |
| |
Coin Bag |
Description PLACEHOLDER |
| |
100-Coin |
Description PLACEHOLDER |
| |
100-Coin |
Description PLACEHOLDER |
| |
POW Block |
Description PLACEHOLDER |
| |
Ice Flower |
Description PLACEHOLDER |
| |
Coin Bag |
Description PLACEHOLDER |
| |
Shiny Mushroom |
Description PLACEHOLDER |
| |
| Scorching Sandpaper Far West | 1 block | |||
Shiny Hurlhammer |
Description PLACEHOLDER |
| |
| Fire Vellumental Cave | 16 blocks | |||
4 Coins |
Description PLACEHOLDER |
| |
Ice Flower |
Description PLACEHOLDER |
| |
8 Coins |
Description PLACEHOLDER |
| |
Flashy Iron Boots |
Description PLACEHOLDER |
| |
Shiny Mushroom |
Description PLACEHOLDER |
| |
100-Coin |
Description PLACEHOLDER |
| |
| Temple of Shrooms | 6 blocks | |||
Shiny Mushroom |
Description PLACEHOLDER |
| |
100-Coin |
Description PLACEHOLDER |
| |
100-Coin |
Description PLACEHOLDER |
| |
Coin Bag ×2 |
Description PLACEHOLDER |
| |
100-Coin |
Description PLACEHOLDER |
| |
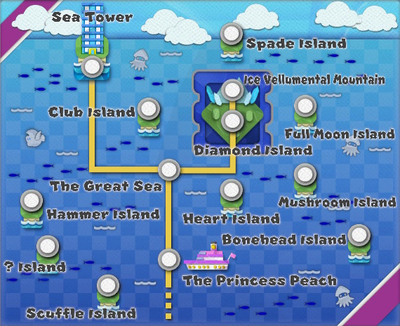
Purple Streamer
There are a total of 33** ? Blocks to find in the Purple Streamer area, 9 of which are hidden:
- The Princess Peach holds 2 blocks
- Bonehead Island holds 1 block
- Heart Island holds 1 block
- Spade Island holds 2 blocks
- Club Island holds 1 block
- Full Moon Island holds 2 blocks
- ? Island holds 5** blocks
- Hammer Island holds 4 blocks
- Ice Vellumental Mountain holds 10 blocks
- Sea Tower holds 5 blocks
** - In reality there are 173 blocks on ? Island, however only 5 are required to satisfy game completion. The true total given this amount is 201 ? Blocks across the Great Sea.
| Hidden | Item | Description | Image |
|---|---|---|---|
| The Princess Peach | 2 blocks | |||
Flashy Hammer |
In the stairway room near the ladder to the ship's hold, there is a ? Block. | 
| |
Shiny Iron Boots |
On the second floor deck near the elevator, there is a ? Block beside a window. | 
| |
| Bonehead Island | 1 block | |||
Shiny Ice Flower |
Down a ledge to the east of the island is a local café with a ? Block nearby. |
| |
| Heart Island | 1 block | |||
Coin Bag |
To the left of the central heart-shaped pillar is a ? Block floating above a Not-Bottomless Hole. | 
| |
| Spade Island | 2 blocks | |||
Coin |
Beside a set of large barrels is a smaller barrel, which leaves a blank patch in the grass when destroyed. Hammering here again will reveal a Hidden Block in its place, allowing Mario to still climb the barrels. | 
| |
Hidden Toad #2 |
A barrel with a dark square patch on top can be reached from the other barrels nearby. Jumping from this spot reveals another ? Block containing a crumpled-up yellow Toad. | 
| |
| Club Island | 1 block | |||
100-Coin |
Beside the island bench is a ? Block containing a 100-Coin. | 
| |
| Full Moon Island | 2 blocks | |||
Coin Bag |
A ? Block hides above a patch of sand centered between three small holes. |
| |
Shiny Tail |
Above the northside of the island near the local fishing dock, there is a ? Block. |
| |
| ? Island | 5** blocks (173 total) | |||
100-Coin |
On the path up the island guarded by origami Stone Spikes is a ? Block, which releases a 100-Coin when hit. |
| |
Coin |
Further up the island, there is a Paper Macho Stone Spike atop tall ledges. There is a ? Block resting in the corner of the first ledge, which releases a single coin when struck. |
| |
Coin |
Further up the island, there is a Paper Macho Stone Spike atop tall ledges. On first glance there is no way to climb this second ledge, however there is a Hidden Block on the patch of ground that lacks grass in a similar location to the previous block. |
| |
POW Block |
On the east edge of the island is a slope descending into an area below the rows of ? Blocks, with one close enough to reach. Striking this block will release a POW Block that can be interacted with. |
| |
Confetti Random Mushroom and Coins |
The focal point of ? Island is the large grid of 169 ? Blocks. Striking the POW Block will release their contents, including bags of confetti, coins, and sometimes a Mushroom or Shiny Mushroom.
NOTE: Only one of these blocks need to be struck to contribute to the ? Block Head Trophy. |
| |
| Hammer Island | 4 blocks | |||
Shiny Fire Flower |
Description PLACEHOLDER |
| |
Flashy Iron Boots |
Description PLACEHOLDER |
| |
Shiny Ice Flower |
Description PLACEHOLDER |
| |
.jpg) Collectible Treasure #79 |
Treasure: Captain T. Ode |
| |
| Ice Vellumental Mountain | 10 blocks | |||
Flashy Iron Boots |
Description PLACEHOLDER |
| |
100-Coin |
Description PLACEHOLDER |
| |
100-Coin |
Description PLACEHOLDER |
| |
100-Coin |
Description PLACEHOLDER |
| |
Flashy Iron Boots |
Description PLACEHOLDER |
| |
Coin Bag |
Description PLACEHOLDER |
| |
Coin Bag |
Description PLACEHOLDER |
| |
Flashy Mushroom Shiny Fire Flower Shiny Tail |
Description PLACEHOLDER |
| |
| Sea Tower | 5 blocks | |||
Shiny Tail POW Block |
Near the corners of the Earth Vellumental wall are two ? Blocks. The left block contains a POW Block, while the right contains a Shiny Tail. |

| |
100-Coin |
At the top of the Earth Vellumental puzzle room is a ? Block near a pillar that has been taped. |
| |
100-Coin |
Behind the large red button on the Fire Vellumental Statue of the second floor is a ? Block. |
| |
100-Coin |
After navigating a group of tiles above flaming oil on the second floor, similar to a section within the Fire Vellumental Cave, Mario reaches a ledge with a ? Block and a set of stairs. |
| |
Green Streamer and Origami Castle
There are a total of 39 ? Blocks to find in the Green Streamer area and Origami Castle collectively, 6 of which are hidden:
- Shangri-Spa holds 8 blocks
- Spring of Jungle Mist holds 5 blocks
- Spring of Rainbows holds 2 blocks
- Bowser's Castle holds 7 block
- Origami Castle holds 17 blocks
| Hidden | Item | Description | Image |
|---|---|---|---|
| Shangri-Spa | 8 blocks | |||
Coin Bag |
To the right of the entrance to Shangri-Spa, there is a ? Block in the shade. | 
| |
Legendary Hammer |
A ? Block can be found tucked away to the left of the Spring of Purification within the main entrance building. |
| |
Coin Bag ×2 |
Behind the main entrance, there are two ? Blocks hidden by trees and guarded by a Hammer Bro. | DO NOT REPLACE | |
Coin Bag |
To the right of the Spring of Sanctuary, a ? Block is tucked away at the edge of the floating island. |
| |
Coin Bag |
Near the entrance to the path to Spring of Rainbows, another ? Block is found on an elevated ledge. |
| |
Coin Bag |
Near the broken, muddy section of wall in front of Bowser's Castle, there is a ledge with a ? Block resting below a tree. |
| |
.jpg) Collectible Treasure #103 |
Required: Defeat the Boss Sumo Bro After gaining access to Bowser's Castle, there is a detour to the left of the entrance with a dark-gray panel and a Hidden Block above, containing a collectible treasure of the Boss Sumo Bro. |

| |
| Spring of Jungle Mist | 5 blocks | |||
Legendary Iron Boots |
There is a ? Block floating above a Not-Bottomless Hole, just southwest of the chest on a large tree stump. | 
| |
Coin Bag |
In a large outcropping with two trees, a ? Block floats next to the Ptooie holding a Magic Circle shard. | 
| |
Legendary Boots |
Near the large jungle tree's roots, a Hidden Block hides above a Not-Bottomless Hole. | 
| |
Flashy Mushroom |
After climbing up the first jungle tree ladder, a ? Block can be found to the right, revealed by a gap in the leaves. | 
| |
Coin Bag |
After climbing the second jungle tree ladder, Mario can find the last ? Block above the nearby branch. | 
| |
| Spring of Rainbows | 2 blocks | |||
Confetti |
Along the windy path is a ? Block containing a bag of confetti. | 
| |
100-Coin |
At the second safe alcove along the windy path is a ? Block and a sign. | 
| |
| Bowser's Castle | 7 blocks | |||
Legendary Boots Legendary Hammer |
At either backwall corner in the mess hall is a ? Block containing a legendary weapon. | 
| |
Flashy Mushroom |
A ? Block can be found to the right of a table on the elevated section of the mess hall. | 
| |
Legendary Iron Boots |
On the opposite side of the table from the previous ? Block is a Hidden Block above a white tile. | 
| |
Legendary Iron Boots |
A ? Block can be found above a Not-Bottomless Hole on the other side of a collapsed pillar, in the room leading to enemy quarters. | 
| |
Shiny Hurlhammer |
Within the quarters of the Hammer Bros there is a Hidden Block, indicated by a red panel visible when peering through a window in the hallway. | 
| |
Coin Bag |
Within the airship hangar found in the west side of Bowser's Castle, there is a ? Block floating above a pile of crates. | 
| |
| Origami Castle | 17 blocks | |||
Legendary Hammer Legendary Boots |
At the foot of Origami Castle is a pair of ? Blocks, one near the Save Block containing a Legendary Hammer, and another near the Musée Champignon pipe containing Legendary Boots. |
| |
Coin Bag |
Description PLACEHOLDER |
| |
.jpg) Collectible Treasure #113 |
A ? Block containing a Collectible Treasure of Luigi's Kart rests at the end of the left path in the first room, guarded by a Fire Bro. |

| |
Coin Bag |
Description PLACEHOLDER |
| |
Magic Circle |
Description PLACEHOLDER |
| |
Coin Bag ×2 Flashy Mushroom Collectible Treasure #114 |
In the southwest corner of the room left of the main hall is a set of four ? Blocks. The top two blocks each contain a bag of 1,000 coins, the bottom left block contains a Flashy Mushroom, and the bottom right block contains the Collectible Treasure of a Bullet Bill. | 
| |
Magic Circle |
Description PLACEHOLDER |
| |
.jpg) Collectible Treasure #115 |
After raising and entering the origami house in the room right of the main hall, a ? Block can be found in the back corner, containing a Collectible Treasure of the Paper Plane Squadron. | 
| |
Flashy Mushroom |
Description PLACEHOLDER |
| |
.jpg) Collectible Treasure #116 |
Treasure: Paper Macho Crater Crashers |
| |
.jpg) Collectible Treasure #117 |
Treasure: Paper Mistake Buzzy Beetle |
| |
Flashy Mushroom |
Description PLACEHOLDER |
| |
.jpg) Collectible Treasure #118 |
Treasure: Origami Castle |
| |
Placeholder
| Hidden | Item | Description | Image |
|---|---|---|---|
| 2 blocks | |||
|
|
|||
Collectible Treasure #79 |
|||