Flipsville Galaxy: Difference between revisions
(Note: The conjectural Moving Gate Planet and Gate End Planet count as one planet, as the texture name does not give them separate names.) |
Dongjun713 (talk | contribs) |
||
| (33 intermediate revisions by 19 users not shown) | |||
| Line 1: | Line 1: | ||
{{ | {{course infobox | ||
|image=[[File:Flipsville Galaxy.png|250px]] | |image=[[File:Flipsville Galaxy.png|250px]] | ||
|area=[[World 4 (Super Mario Galaxy 2)|World 4]] | |area=[[World 4 (Super Mario Galaxy 2)|World 4]] | ||
|boss=[[Glamdozer]] | |boss=[[Glamdozer]] | ||
| | |comets=[[Prankster Comet#Purple Comet|Purple Comet]]<br>[[Prankster Comet#Green Comet|Green Comet]] | ||
| | |missions=[[Flip-Flopping in Flipsville]]<br>[[Flipsville's New Digs]]<br>[[Purple Coin Spin Speed Run]]<br>[[#Green Star 1|Green Star 1]]<br>[[#Green Star 2|Green Star 2]]<br>[[#Green Star 3|Green Star 3]] | ||
|stars=[[File:Smg2_icon_powerstar.png|20px]][[File:Smg2_icon_powerstar.png|20px]][[File:Smg2_icon_prankstercomet.png|20px]][[File:Smg2_icon_greencomet.png|20px]][[File:Smg2_icon_greencomet.png|20px]][[File:Smg2_icon_greencomet.png|20px]] | |stars=[[File:Smg2_icon_powerstar.png|20px]][[File:Smg2_icon_powerstar.png|20px]][[File:Smg2_icon_prankstercomet.png|20px]][[File:Smg2_icon_greencomet.png|20px]][[File:Smg2_icon_greencomet.png|20px]][[File:Smg2_icon_greencomet.png|20px]] | ||
|unlock=Get a [[Power Star]] from either [[Supermassive Galaxy]] or [[Sweet Mystery Galaxy]] | |unlock=Get a [[Power Star]] from either [[Supermassive Galaxy]] or [[Sweet Mystery Galaxy]] | ||
|icon= | |icon=[[#Both Side Maze Room Planet|Both Side Maze Room Planet]] | ||
| | |more=[[Supermassive Galaxy|<<]] [[Starshine Beach Galaxy|>>]] | ||
}} | }} | ||
{{quote|Is that our captain?! How did he get way up there...?| | {{quote|Is that our captain?! How did he get way up there...?|Banktoad|Super Mario Galaxy 2}} | ||
'''Flipsville Galaxy''' is | '''Flipsville Galaxy''' is the second level in [[World 4 (Super Mario Galaxy 2)|World 4]] in ''[[Super Mario Galaxy 2]]''. It is home-themed, with a few dollhouse-like planets. The main gimmick in this galaxy is [[grate]]s, which [[Mario]] can [[Ground Pound]] to flip the gravity and switch between the top and underside of each planet. This change is reflected by a screen of white arrows (similar to a [[gravity field]]) against the lavender sky, which always point to the direction of the gravitational pull. Mario can also use grates to defeat the [[Pupdozer]] enemy and its boss variation, [[Glamdozer]], both exclusive to this area. The [[Spin Drill]] is available in later missions. | ||
This is one of four galaxies in ''[[Super Mario Galaxy 2]]'' in which the [[Wii#Wii Remote|Wii Remote]] forewarns the player of upcoming obstacles, the other three being the [[Beat Block Galaxy]], the [[Upside Dizzy Galaxy]], and the [[Battle Belt Galaxy]]. | |||
==Planets== | ==Planets== | ||
===Both Side Maze Room Planet=== | ===Both Side Maze Room Planet=== | ||
[[File:SMG2 Welcome to Flipsville.png|thumb|left|200px|The Both Side Maze Room Planet.]] | |||
[[File:SMG2 Flipsville New Digs Starting Planet.png|thumb|200px|The Starting Planet during Mission 2.]] | |||
The Both Side Maze Room Planet<ref name=Noclip>Texture file names associated with each planet, retrieved from [https://noclip.website/#smg2/OmoteuLandGalaxy noclip.website].</ref> is modeled after the interior of a dollhouse, featuring several rooms separated by wooden walls and the floor. There are many grates that the player can use to go under the stage and vice-versa. [[Pupdozer]]s are bountiful in this area. Some [[Octoomba]]s can be found here along with the [[Comet Medal]]. The [[Launch Star]] is located at the top of the planet. During the second mission, the grates are absent and are replaced with dirt patches. Pupdozers are replaced by [[Mechakoopa|Micro Mecha-Bowser]]s and the [[Spin Drill]] appears in various places. | |||
{{multiple image | {{multiple image | ||
|align= | |align=center | ||
|direction= | |direction=horizontal | ||
|width=200 | |width=200 | ||
|image1=SMG2 Flipsville | |image1=SMG2 Flipsville Starting Planet.png | ||
|caption1=The | |caption1=The other rooms in the Both Side Maze Room Planet. | ||
|image2=SMG2 Flipsville Starting Basement.png | |image2=SMG2 Flipsville Starting Basement.png | ||
|caption2=The basement in Mission 1 and Mission 2. | |caption2=The basement in Mission 1 (below) and Mission 2 (above). | ||
}} | }} | ||
{{br}} | {{br}} | ||
===Both Side Wanwan Planet=== | ===Both Side Wanwan Planet=== | ||
[[File:SMG2 Flipsville Outer House Planet.png|thumb|200px|Mario flying to the | [[File:SMG2 Flipsville Outer House Planet.png|thumb|200px|Mario flying to the Both Side Wanwan Planet.]] | ||
The Both Side Wanwan Planet<ref name=Noclip></ref> | The Both Side Wanwan Planet<ref name=Noclip></ref> resembles a big white dollhouse, with Mario exploring its surroundings. The only enemies here are [[Chain Chomp|Chomp]]s and [[Octoomba]]s. The player can use the grates to their advantage to avoid being hit by a Chomp. The [[Launch Star]] at the end will take the player to the Both Side Lift Planet. | ||
{{br}} | {{br}} | ||
===Both Side Lift Planet=== | ===Both Side Lift Planet=== | ||
[[File:SMG2 Flipsville Moving Gates.png|thumb|200px|Mario riding on a gate.]] | [[File:SMG2 Flipsville Moving Gates.png|thumb|200px|Mario riding on a gate.]] | ||
When the player lands on the Both Side Lift Planet<ref name=Noclip></ref>, they will need to flip the gate to get to the underside | {{multiple image | ||
|align=left | |||
At the end of the planet is a generally small area. The only enemies here are two [[Pupdozer]]s and an [[Octoomba]]. The [[Launch Star]] will take the player to the [[Starshroom]]. | |direction=horizontal | ||
|width=200 | |||
|image1=SMG2 Flipsville Moving Gate Planet.png | |||
|caption1=Mario on the Both Side Lift Planet. | |||
|image2=SMG2 Flipsville End Gate Planet.png | |||
|caption2=Mario at the end of the Both Side Lift Planet. | |||
}} | |||
When the player lands on the Both Side Lift Planet<ref name=Noclip></ref>, they will need to flip the gate to get to the underside. The next section involves a series of moving platforms with grates in the middle, which they must use carefully to avoid spikes. At the end of the planet is a generally small area. The only enemies here are two [[Pupdozer]]s on the top and an [[Octoomba]] on the opposite side. The [[Launch Star]] among the Pupdozers will take the player to the [[Starshroom]]. | |||
{{br}} | |||
===Starshroom=== | ===Starshroom=== | ||
[[File:SMG2 Flipsville Starshroom.png|thumb|200px|The Starshroom.]] | [[File:SMG2 Flipsville Starshroom.png|thumb|200px|The Starshroom.]] | ||
This | This Starshroom is visited right before the fight with [[Glamdozer]]. [[Hint Toad|Blue Toad]] can be found here to give Mario a hint as to how to defeat Glamdozer. The [[Prima Games]] guide mistakenly colors the Starshroom blue, but in the game, it's actually red. As of this point, the sky becomes blue and the surrounding white arrows disappear. | ||
===Boss Bussun Planet=== | ===Boss Bussun Planet=== | ||
[[File:SMG2 Flipsville Glamdozer Planet.png|thumb|left|200px|Mario on the Boss Bussun Planet.]] | [[File:SMG2 Flipsville Glamdozer Planet.png|thumb|left|200px|Mario on the Boss Bussun Planet.]] | ||
The Boss Bussun Planet<ref name=Noclip></ref> is | The Boss Bussun Planet<ref name=Noclip></ref> is a flat, circular green planet with six grates and [[coin]]s. The player fights Glamdozer here. Unlike the planets before it, Mario can travel between its sides alternatively by walking over the edge. | ||
{{br}} | {{br}} | ||
| Line 62: | Line 63: | ||
[[File:SMG2 Flipsville Dirt Tower Top Side.png|thumb|200px|left|Mario drilling through the Both Side Drill Tower Planet.]] | [[File:SMG2 Flipsville Dirt Tower Top Side.png|thumb|200px|left|Mario drilling through the Both Side Drill Tower Planet.]] | ||
[[File:SMG2 Dirt Tower Underside.png|thumb|200px|Mario at the bottom of the Both Side Drill Tower Planet.]] | [[File:SMG2 Dirt Tower Underside.png|thumb|200px|Mario at the bottom of the Both Side Drill Tower Planet.]] | ||
The Both Side Drill Tower Planet<ref name=Noclip></ref> is | The Both Side Drill Tower Planet<ref name=Noclip></ref> is a small patch of dirt being transversed by a large dirt tower straight through the middle. The player must use the [[Spin Drill]] located behind the tower to get to the top where the [[Warp Pipe]] is. The only enemies here are [[Twirlip]]s. | ||
{{br}} | {{br}} | ||
===Timer Gravity Change Drill Room=== | ===Timer Gravity Change Drill Room=== | ||
[[File:SMG2 Flipsville Underground Gravity Area.png|thumb|200px|Mario in the | [[File:SMG2 Flipsville Underground Gravity Area.png|thumb|200px|Mario in the Timer Gravity Change Drill Room.]] | ||
The Timer Gravity Change Drill Room<ref name=Noclip></ref> can be accessed by taking the | The Timer Gravity Change Drill Room<ref name=Noclip></ref> can be accessed by taking the Warp Pipe on the Both Side Drill Tower Planet. The music played here is [[Beat Block Galaxy]]'s. This area is separated into nine sections like a 3×3 grid. Each room has its own gravity field, which cycles between two specific directions following the rhythmic signal of the background music. The player must use the [[Spin Drill]] here to find five [[Silver Star]]s in the second mission and 100 [[Purple Coin]]s in the third mission. The only enemies here are [[Fuzzy|Fuzzies]]. | ||
{{br}} | {{br}} | ||
==Enemies== | ==Enemies== | ||
<gallery> | <gallery> | ||
| Line 74: | Line 76: | ||
Electrogoomba.png|[[Octoomba]]s | Electrogoomba.png|[[Octoomba]]s | ||
SMG2 Chomp.png|[[Chain Chomp|Chomp]]s | SMG2 Chomp.png|[[Chain Chomp|Chomp]]s | ||
SMG2 Micro Mecha Bowser Artwork.png|[[Micro Mecha-Bowser]]s | SMG2 Micro Mecha Bowser Artwork.png|[[Mechakoopa|Micro Mecha-Bowser]]s | ||
Twirlip.png|[[Twirlip]]s | Twirlip.png|[[Twirlip]]s | ||
Fuzzy Artwork - Super Mario Galaxy 2.png|[[Fuzzy|Fuzzies]] | Fuzzy Artwork - Super Mario Galaxy 2.png|[[Fuzzy|Fuzzies]] | ||
| Line 118: | Line 120: | ||
====Green Star 2==== | ====Green Star 2==== | ||
[[File:SMG2 Flipsville Green Star 2.png|thumb|200px|Luigi about to get the second Green Star.]] | [[File:SMG2 Flipsville Green Star 2.png|thumb|200px|Luigi about to get the second Green Star.]] | ||
The player will redo the [[Flip-Flopping in Flipsville]] mission. When the player gets to the [[#Both Side Wanwan Planet|Both Side Wanwan Planet]], they should avoid the first [[Chain Chomp|Chomp]] and use the gate to get to the second area. When the player reaches the circle with the [[Life Mushroom]], they should notice a raised platform. The player must execute either a backflip followed by Star Spin or a wall jump and Star Spin to get the [[Green Star]] on the roof. | The player will redo the [[Flip-Flopping in Flipsville]] mission. When the player gets to the [[#Both Side Wanwan Planet|Both Side Wanwan Planet]], they should avoid the first [[Chain Chomp|Chomp]] and use the gate to get to the second area. When the player reaches the circle with the [[Life Mushroom]], they should notice a raised platform with an [[Octoomba]] on it. The player must execute either a backflip followed by Star Spin or a wall jump and Star Spin to get the [[Green Star]] on the roof. | ||
;Planets Visited | ;Planets Visited | ||
| Line 133: | Line 135: | ||
</gallery> | </gallery> | ||
{{br}} | {{br}} | ||
====Green Star 3==== | ====Green Star 3==== | ||
[[File:SMG2 Flipsville Green Star 3.png|thumb|200px|Luigi looking at the third Green Star.]] | [[File:SMG2 Flipsville Green Star 3.png|thumb|200px|Luigi looking at the third Green Star.]] | ||
The player will redo the [[Flip-Flopping in Flipsville]] mission. When the player gets to the end of the [[#Both Side Lift Planet Planet|Both Side Lift Planet]], they should notice the Green Star out of reach in the top right corner. The player must flip the grate to get under the level, causing the gravity to change as shown by the arrows. The player will then need to jump from the bottom right corner to get the star. If the player misses the Star, they will automatically lose a life. | The player will redo the [[Flip-Flopping in Flipsville]] mission. When the player gets to the end of the [[#Both Side Lift Planet Planet|Both Side Lift Planet]], they should notice the Green Star out of reach in the top right corner. The player must flip the grate to get under the level, causing the gravity to change as shown by the arrows. The player will then need to jump from the bottom right corner to get the star. If the player misses the Star, they will automatically lose a life. | ||
Alternatively, the player can perform a [[Ground Pound#Super Mario Galaxy|homing Ground Pound]] to collect the Star, though the player should be positioned close enough to the star to avoid missing. | |||
;Planets Visited | ;Planets Visited | ||
| Line 154: | Line 159: | ||
{{media table | {{media table | ||
|file1=Super Mario Galaxy 2 Flipsville Chompworks.oga | |file1=Super Mario Galaxy 2 Flipsville Chompworks.oga | ||
|title1= | |title1=Flipsville Galaxy | ||
|description1=Soundtrack for Flipsville Galaxy (full version). [[Chompworks Galaxy]] also shares this theme. | |description1=Soundtrack for Flipsville Galaxy (full version). [[Chompworks Galaxy]] also shares this theme. | ||
|length1= | |length1=0:30 | ||
}} | }} | ||
==Prima Official Game Guide description== | |||
*''"Flipsville Galaxy has fun with the pull of gravity. You are usually pulled toward the floor, no matter which side of the planet you stand on. Use grates to flip back and forth between sides of the planets as you pursue the [[Power Star]]s."'' | |||
==Names in other languages== | ==Names in other languages== | ||
| Line 163: | Line 171: | ||
|Jap=オモテウランドギャラクシー | |Jap=オモテウランドギャラクシー | ||
|JapR=Omoteurando Gyarakushī | |JapR=Omoteurando Gyarakushī | ||
|JapM= | |JapM=Portmanteau of「表裏」(''omote-ura'', two sides) and "land" + "galaxy" | ||
|Spa=Galaxia Cara y Cruz | |Spa=Galaxia Cara y Cruz | ||
|SpaM=Heads and Tails Galaxy | |SpaM=Heads and Tails Galaxy | ||
| | |FreA=Galaxie du Monde à l'envers | ||
| | |FreAM=Upside World Galaxy | ||
| | |FreE=Monde à l'envers | ||
| | |FreEM=Upside world | ||
|Ita=Galassia Sottosopra | |Ita=Galassia Sottosopra | ||
|ItaM=Upside-down Galaxy | |ItaM=Upside-down Galaxy | ||
|Ger=Klappstadt-Galaxie | |Ger=Klappstadt-Galaxie | ||
|GerM= | |GerM=From "klappen" (to fold) and "stadt" (city) | ||
|Chi=正反顛倒銀河 | |Chi=正反顛倒銀河 | ||
|ChiR=Zhèngfǎn Diāndǎo Yínhé | |ChiR=Zhèngfǎn Diāndǎo Yínhé | ||
|ChiM=Upside Down Galaxy | |ChiM=Upside Down Galaxy | ||
|Kor=앞뒤랜드 갤럭시 | |||
|KorR=Apdwi Laendeu Gaelleogsi | |||
|KorM=Front-and-Back Land Galaxy | |||
}} | }} | ||
==Trivia== | ==Trivia== | ||
*A glitch can occur in the first mission if the player gets to the second planet, touches the [[Checkpoint Flag]], backflips onto a nearby overhang, long jumps and spin to the first planet, and takes the Launch Star. About halfway through, [[Mario]] will lose a life. | *A glitch can occur in the first mission if the player gets to the second planet, touches the [[Checkpoint Flag]], backflips onto a nearby overhang, long jumps and spin to the first planet, and takes the Launch Star. About halfway through, [[Mario]] will lose a life. | ||
| Line 186: | Line 196: | ||
<references/> | <references/> | ||
{{SMG2}} | {{SMG2 missions}} | ||
[[Category:Homes]] | |||
[[Category:Galaxies]] | [[Category:Galaxies]] | ||
[[Category:Super Mario Galaxy 2 | [[Category:Super Mario Galaxy 2 locations]] | ||
[[de:Klappstadt-Galaxie]] | [[de:Klappstadt-Galaxie]] | ||
Revision as of 10:20, February 3, 2024
| Flipsville Galaxy | |
|---|---|

| |
| Area | World 4 |
| How to unlock | Get a Power Star from either Supermassive Galaxy or Sweet Mystery Galaxy |
| Boss(es) | Glamdozer |
| Comet(s) | Purple Comet Green Comet |
| Mission(s) | Flip-Flopping in Flipsville Flipsville's New Digs Purple Coin Spin Speed Run Green Star 1 Green Star 2 Green Star 3 |
| Stars | |
| Galaxy icon | Both Side Maze Room Planet |
| << >> | |
- “Is that our captain?! How did he get way up there...?”
- —Banktoad, Super Mario Galaxy 2
Flipsville Galaxy is the second level in World 4 in Super Mario Galaxy 2. It is home-themed, with a few dollhouse-like planets. The main gimmick in this galaxy is grates, which Mario can Ground Pound to flip the gravity and switch between the top and underside of each planet. This change is reflected by a screen of white arrows (similar to a gravity field) against the lavender sky, which always point to the direction of the gravitational pull. Mario can also use grates to defeat the Pupdozer enemy and its boss variation, Glamdozer, both exclusive to this area. The Spin Drill is available in later missions.
This is one of four galaxies in Super Mario Galaxy 2 in which the Wii Remote forewarns the player of upcoming obstacles, the other three being the Beat Block Galaxy, the Upside Dizzy Galaxy, and the Battle Belt Galaxy.
Planets
Both Side Maze Room Planet


The Both Side Maze Room Planet[1] is modeled after the interior of a dollhouse, featuring several rooms separated by wooden walls and the floor. There are many grates that the player can use to go under the stage and vice-versa. Pupdozers are bountiful in this area. Some Octoombas can be found here along with the Comet Medal. The Launch Star is located at the top of the planet. During the second mission, the grates are absent and are replaced with dirt patches. Pupdozers are replaced by Micro Mecha-Bowsers and the Spin Drill appears in various places.


Both Side Wanwan Planet

The Both Side Wanwan Planet[1] resembles a big white dollhouse, with Mario exploring its surroundings. The only enemies here are Chomps and Octoombas. The player can use the grates to their advantage to avoid being hit by a Chomp. The Launch Star at the end will take the player to the Both Side Lift Planet.
Both Side Lift Planet


When the player lands on the Both Side Lift Planet[1], they will need to flip the gate to get to the underside. The next section involves a series of moving platforms with grates in the middle, which they must use carefully to avoid spikes. At the end of the planet is a generally small area. The only enemies here are two Pupdozers on the top and an Octoomba on the opposite side. The Launch Star among the Pupdozers will take the player to the Starshroom.
Starshroom

This Starshroom is visited right before the fight with Glamdozer. Blue Toad can be found here to give Mario a hint as to how to defeat Glamdozer. The Prima Games guide mistakenly colors the Starshroom blue, but in the game, it's actually red. As of this point, the sky becomes blue and the surrounding white arrows disappear.
Boss Bussun Planet

The Boss Bussun Planet[1] is a flat, circular green planet with six grates and coins. The player fights Glamdozer here. Unlike the planets before it, Mario can travel between its sides alternatively by walking over the edge.
Both Side Drill Tower Planet


The Both Side Drill Tower Planet[1] is a small patch of dirt being transversed by a large dirt tower straight through the middle. The player must use the Spin Drill located behind the tower to get to the top where the Warp Pipe is. The only enemies here are Twirlips.
Timer Gravity Change Drill Room

The Timer Gravity Change Drill Room[1] can be accessed by taking the Warp Pipe on the Both Side Drill Tower Planet. The music played here is Beat Block Galaxy's. This area is separated into nine sections like a 3×3 grid. Each room has its own gravity field, which cycles between two specific directions following the rhythmic signal of the background music. The player must use the Spin Drill here to find five Silver Stars in the second mission and 100 Purple Coins in the third mission. The only enemies here are Fuzzies.
Enemies
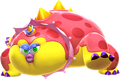
Glamdozer (boss)


Missions
| Level | Image | Summary |
|---|---|---|
| Flip-Flopping in Flipsville | 
|
This mission's objective is to defeat Glamdozer. |
| Flipsville's New Digs | 
|
This mission's objective is to navigate a series of planets and obstacles using the Spin Drill to find the Power Star. |
| Purple Coin Spin Speed Run | 
|
This mission's objective is to collect all of the Purple Coins within a time limit. |
Green Stars
Green Star 1

The player will redo the Flip-Flopping in Flipsville mission. This time, when the player gets to the Launch Star on the Both Side Maze Room Planet, they should look around for an edge of a wall that is glimmering. The player will need to stay close to the edge of the wall and fall down to get the Star.
- Planets Visited
- Enemies
Green Star 2

The player will redo the Flip-Flopping in Flipsville mission. When the player gets to the Both Side Wanwan Planet, they should avoid the first Chomp and use the gate to get to the second area. When the player reaches the circle with the Life Mushroom, they should notice a raised platform with an Octoomba on it. The player must execute either a backflip followed by Star Spin or a wall jump and Star Spin to get the Green Star on the roof.
- Planets Visited
- Enemies
Green Star 3

The player will redo the Flip-Flopping in Flipsville mission. When the player gets to the end of the Both Side Lift Planet, they should notice the Green Star out of reach in the top right corner. The player must flip the grate to get under the level, causing the gravity to change as shown by the arrows. The player will then need to jump from the bottom right corner to get the star. If the player misses the Star, they will automatically lose a life.
Alternatively, the player can perform a homing Ground Pound to collect the Star, though the player should be positioned close enough to the star to avoid missing.
- Planets Visited
- Enemies
Music
| File info 0:30 |
Prima Official Game Guide description
- "Flipsville Galaxy has fun with the pull of gravity. You are usually pulled toward the floor, no matter which side of the planet you stand on. Use grates to flip back and forth between sides of the planets as you pursue the Power Stars."
Names in other languages
| Language | Name | Meaning |
|---|---|---|
| Japanese | オモテウランドギャラクシー Omoteurando Gyarakushī |
Portmanteau of「表裏」(omote-ura, two sides) and "land" + "galaxy" |
| Chinese | 正反顛倒銀河 Zhèngfǎn Diāndǎo Yínhé |
Upside Down Galaxy |
| French (NOA) | Galaxie du Monde à l'envers |
Upside World Galaxy |
| French (NOE) | Monde à l'envers |
Upside world |
| German | Klappstadt-Galaxie |
From "klappen" (to fold) and "stadt" (city) |
| Italian | Galassia Sottosopra |
Upside-down Galaxy |
| Korean | 앞뒤랜드 갤럭시 Apdwi Laendeu Gaelleogsi |
Front-and-Back Land Galaxy |
| Spanish | Galaxia Cara y Cruz |
Heads and Tails Galaxy |
Trivia
- A glitch can occur in the first mission if the player gets to the second planet, touches the Checkpoint Flag, backflips onto a nearby overhang, long jumps and spin to the first planet, and takes the Launch Star. About halfway through, Mario will lose a life.