World 3-8 (Super Mario Bros. 3): Difference between revisions
(Capitalisation on the notice) |
Nikenpelle (talk | contribs) m (→Enemies: Syntax fix) |
||
| (15 intermediate revisions by 10 users not shown) | |||
| Line 1: | Line 1: | ||
{{italic title|id=yes}} | |||
{{italic title| | {{level infobox | ||
{{ | |||
|image=[[File:SMAS SMB3 World 3-8 Screenshot.png|256px]] | |image=[[File:SMAS SMB3 World 3-8 Screenshot.png|256px]] | ||
|code=World 3-8 | |code=World 3-8 | ||
| Line 15: | Line 13: | ||
==Layout== | ==Layout== | ||
[[File:BossBassEatingMario.png|thumb|left|256px]] | [[File:BossBassEatingMario.png|thumb|left|256px]] | ||
This level has a similar gameplay design to [[World 3- | This level has a similar gameplay design to [[World 3-3 (Super Mario Bros. 3)|World 3-3]], as [[Big Cheep Cheep|Boss Bass]] returns from that level and the tides change rapidly, raising or lowering any platform [[Mario]] is standing on. Boss Bass also always returns shortly after being defeated. This level has three [[Beanstalk]]s as well to help Mario avoid Boss Bass's attacks. This level begins with Mario on a platform and Boss Bass immediately swimming below. As the tide lowers, Mario must jump on the elevated part of the platform. Next is a small gap to a lower platform that Mario can jump over entirely to reach the next platform. This platform has a [[Brick Block]] on either side with a green [[Koopa Troopa]] walking in between. There is also a [[Note Block|Jump Block]] above that produces either a [[Super Mushroom]] or a [[Fire Flower]]. If the Brick Block on the left is hit with the Koopa Troopa's shell or a tail attack from [[Raccoon Mario]], a Beanstalk appears and grows until it hits a [[Hard Block|Wood Block]] above. Next, is a small platform and then a raised one. The raised platform has two [[White Block]]s stacked below a Brick Block. This Brick Block produces ten [[coin]]s if hit ten times. To the right of this platform is a series of lower platforms. One of them has a single Brick Block on the ground which produces a [[1-Up Mushroom]] if hit. The next platform has two Brick Blocks on either side with a Koopa Troopa walking in between again. The right Brick Block produces another Beanstalk if hit. The next platform has two breakable Brick Blocks and leads to another platform with a floating Brick Block. Mario can jump and hit this block, producing another Beanstalk. The next platforms are more elevated than the previous ones. One platform leads to below to a [[lift]] floating in the water. This lift is next to a platform roofed by another one above it. Inside this structure is a [[P Switch|Switch Block]] which produces white coins. If forty-four of these coins are collected, Mario will have access to a [[Toad House#White Mushroom House|White Mushroom House]] after the level and be rewarded with a [[P-Wing]]. On the platform above the area with the Switch Block is a stack of three Brick Blocks. The one on top produces another 1-Up Mushroom when hit. Mario then is lead to the end of the area where he must run through a [[Warp Pipe]]. This Warp Pipe leads Mario to the final area, which is a bridge across a body of water that leads to the level's [[Goal (Super Mario Bros. 3)|goal]]. | ||
==Enemies== | ==Enemies== | ||
{| class="wikitable" style="text-align: center" | |||
! Name !! Count | |||
|- | |||
|[[File:SMB3 Big Bertha.png]]<br>[[Big Cheep Cheep|Boss Bass]] | |||
|1 | |||
|- | |||
|[[File:Green Koopa SMB3.gif]]<br>[[Koopa Troopa|Green Koopa Troopa]] | |||
|2 | |||
|} | |||
==Level layout== | |||
{{Wide image|SMB3 World 3-8 Map.png|500|Map in the NES version}} | |||
{{Wide image|SMAS SMB3 World 3-8 Map.png|500|Map in the SNES version}} | |||
==Level Statistics== | ==Level Statistics== | ||
| Line 26: | Line 35: | ||
*Secret areas: 0 | *Secret areas: 0 | ||
{{SMB3 | {{SMB3 levels}} | ||
[[Category:Super Mario Bros. 3 | [[Category:Aquatic areas]] | ||
[[Category:Super Mario Bros. 3 levels]] | |||
Latest revision as of 06:40, January 26, 2024
| Level | |
|---|---|
| World 3-8 | |

| |
| Level code | World 3-8 |
| World | Water Land |
| Game | Super Mario Bros. 3 |
| Time limit | 300 seconds |
| << << << Directory of levels >> | |
World 3-8 is the eight normal and tenth overall level of Water Land in Super Mario Bros. 3 and its remakes. This level is accessible after 3-6 is completed, but can only be accessed if the drawbridge between the two levels is down. If the drawbridge is up, the player can complete World 3-7 and then have access to World 3-8. Chronologically, it is played after the second World 3-![]() Fortress is completed.
Fortress is completed.
Layout[edit]
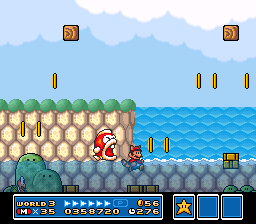
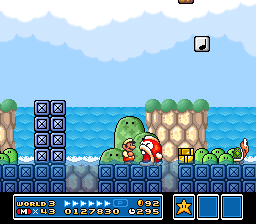
This level has a similar gameplay design to World 3-3, as Boss Bass returns from that level and the tides change rapidly, raising or lowering any platform Mario is standing on. Boss Bass also always returns shortly after being defeated. This level has three Beanstalks as well to help Mario avoid Boss Bass's attacks. This level begins with Mario on a platform and Boss Bass immediately swimming below. As the tide lowers, Mario must jump on the elevated part of the platform. Next is a small gap to a lower platform that Mario can jump over entirely to reach the next platform. This platform has a Brick Block on either side with a green Koopa Troopa walking in between. There is also a Jump Block above that produces either a Super Mushroom or a Fire Flower. If the Brick Block on the left is hit with the Koopa Troopa's shell or a tail attack from Raccoon Mario, a Beanstalk appears and grows until it hits a Wood Block above. Next, is a small platform and then a raised one. The raised platform has two White Blocks stacked below a Brick Block. This Brick Block produces ten coins if hit ten times. To the right of this platform is a series of lower platforms. One of them has a single Brick Block on the ground which produces a 1-Up Mushroom if hit. The next platform has two Brick Blocks on either side with a Koopa Troopa walking in between again. The right Brick Block produces another Beanstalk if hit. The next platform has two breakable Brick Blocks and leads to another platform with a floating Brick Block. Mario can jump and hit this block, producing another Beanstalk. The next platforms are more elevated than the previous ones. One platform leads to below to a lift floating in the water. This lift is next to a platform roofed by another one above it. Inside this structure is a Switch Block which produces white coins. If forty-four of these coins are collected, Mario will have access to a White Mushroom House after the level and be rewarded with a P-Wing. On the platform above the area with the Switch Block is a stack of three Brick Blocks. The one on top produces another 1-Up Mushroom when hit. Mario then is lead to the end of the area where he must run through a Warp Pipe. This Warp Pipe leads Mario to the final area, which is a bridge across a body of water that leads to the level's goal.
Enemies[edit]
| Name | Count |
|---|---|
Boss Bass |
1 |
Green Koopa Troopa |
2 |
Level layout[edit]
Level Statistics[edit]
- Power-ups: 1 (Super Mushroom or Fire Flower)
- 1-Up Mushrooms: 2
- Secret areas: 0


